> ## Documentation Index
> Fetch the complete documentation index at: https://stackone-hub-int-8679-hris-ukgprowfm-integration-user-manag.mintlify.site/llms.txt
> Use this file to discover all available pages before exploring further.

# Ashby Background Check

> To successfully send test notifications from Ashby, follow these steps in your Ashby account, and complete the necessary actions.

<Warning>
  The following guidance assumes you have Admin privileges for your Ashby
  account.
</Warning>

## To Get External Trigger Token

<Steps>
  <Step title="To get the External Trigger Token">
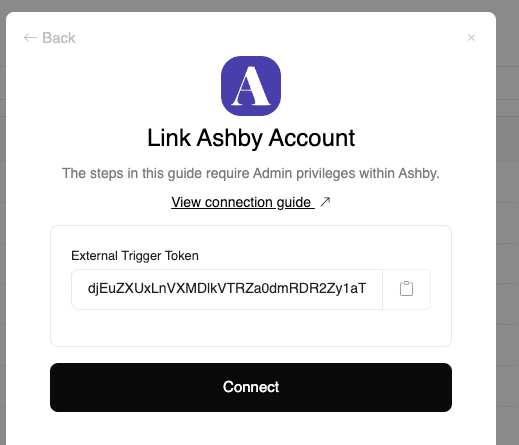
    From the StackOne hub, you will receive the `External Trigger Token` needed to enable the Ashby Integration.
    <Frame>
      <img className="rounded-md" style={{ margin: '0 auto', border: '1px solid #efefef' }} alt="Maintain Assessment Status" src="https://mintcdn.com/stackone-hub-int-8679-hris-ukgprowfm-integration-user-manag/JqrPpQ92JYXhXNTR/images/ashby-background-check/ashby-external-key.png?fit=max&auto=format&n=JqrPpQ92JYXhXNTR&q=85&s=78b325fbe874d1900bd42d413a8227fe" width="519" height="445" data-path="images/ashby-background-check/ashby-external-key.png" />
    </Frame>
  </Step>
</Steps>

## To enable the integration on your Ashby account

<Steps>
  <Step title="Go to Integration">
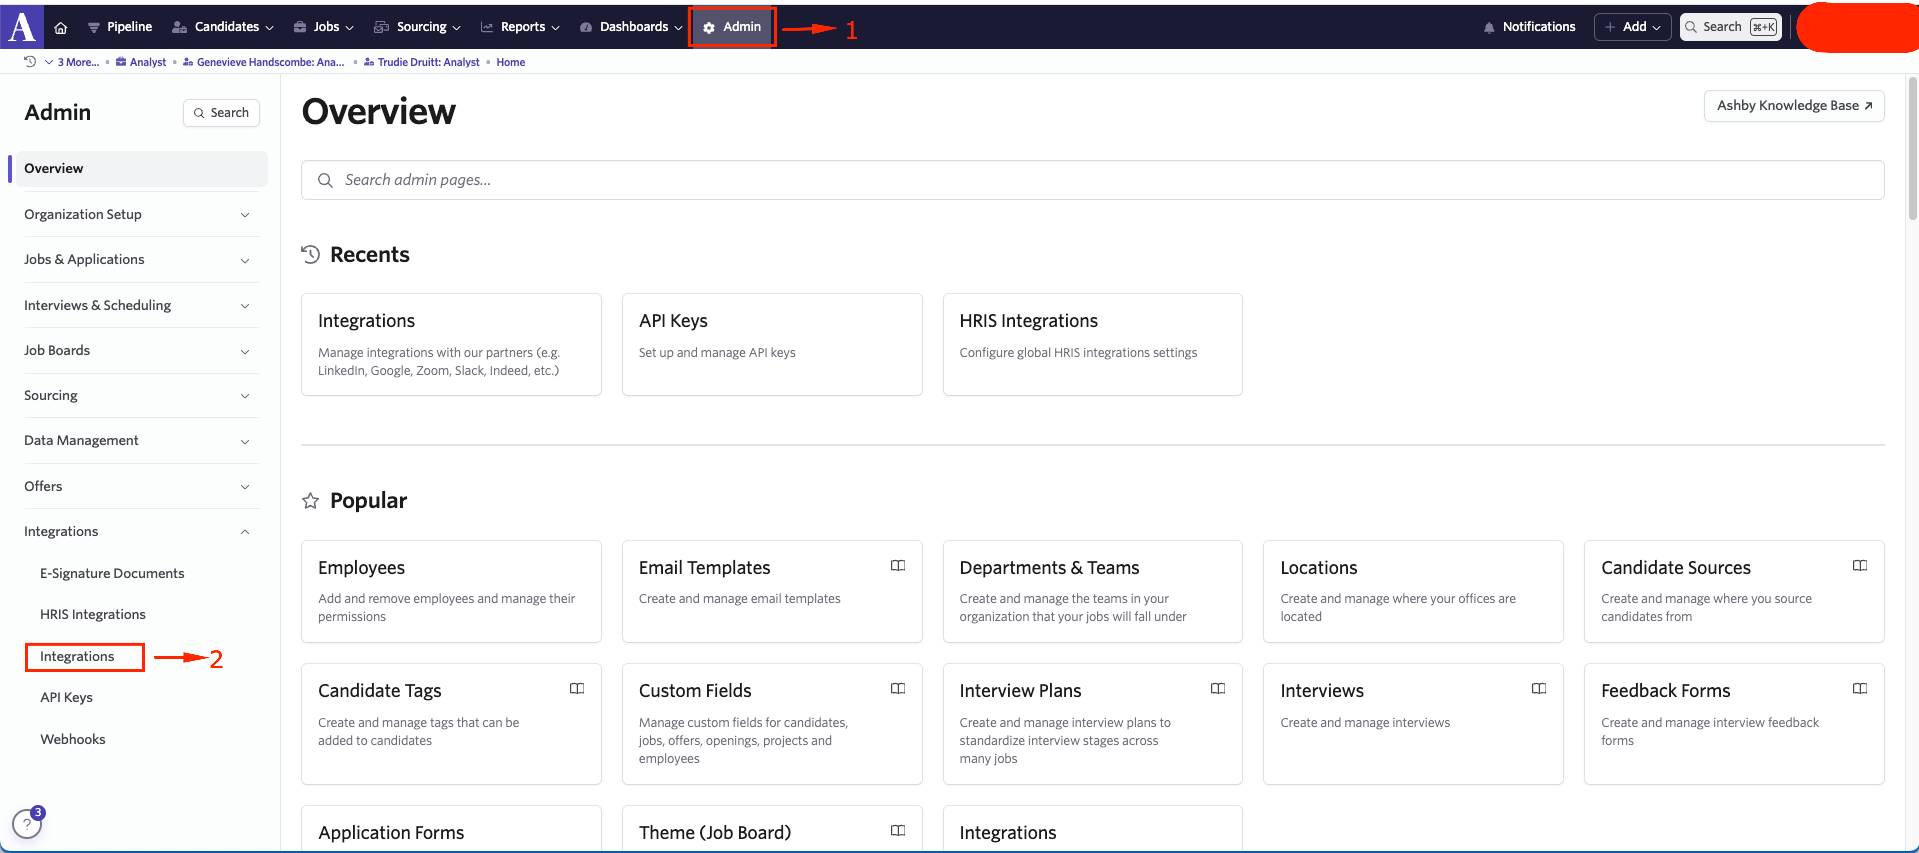
    Please navigate to `Admin` in Ashby’s dashboard. Then navigate to `Integrations` and click on it
    <Frame>
      <img className="rounded-md" style={{ margin: '0 auto', border: '1px solid #efefef' }} alt="Maintain Assessment Status" src="https://mintcdn.com/stackone-hub-int-8679-hris-ukgprowfm-integration-user-manag/JqrPpQ92JYXhXNTR/images/ashby-background-check/ashby-bcheck-1.png?fit=max&auto=format&n=JqrPpQ92JYXhXNTR&q=85&s=1dfca4da10900959c90a208cea180be8" width="1919" height="853" data-path="images/ashby-background-check/ashby-bcheck-1.png" />
    </Frame>
  </Step>

  <Step title="To enable the Stackone integration">
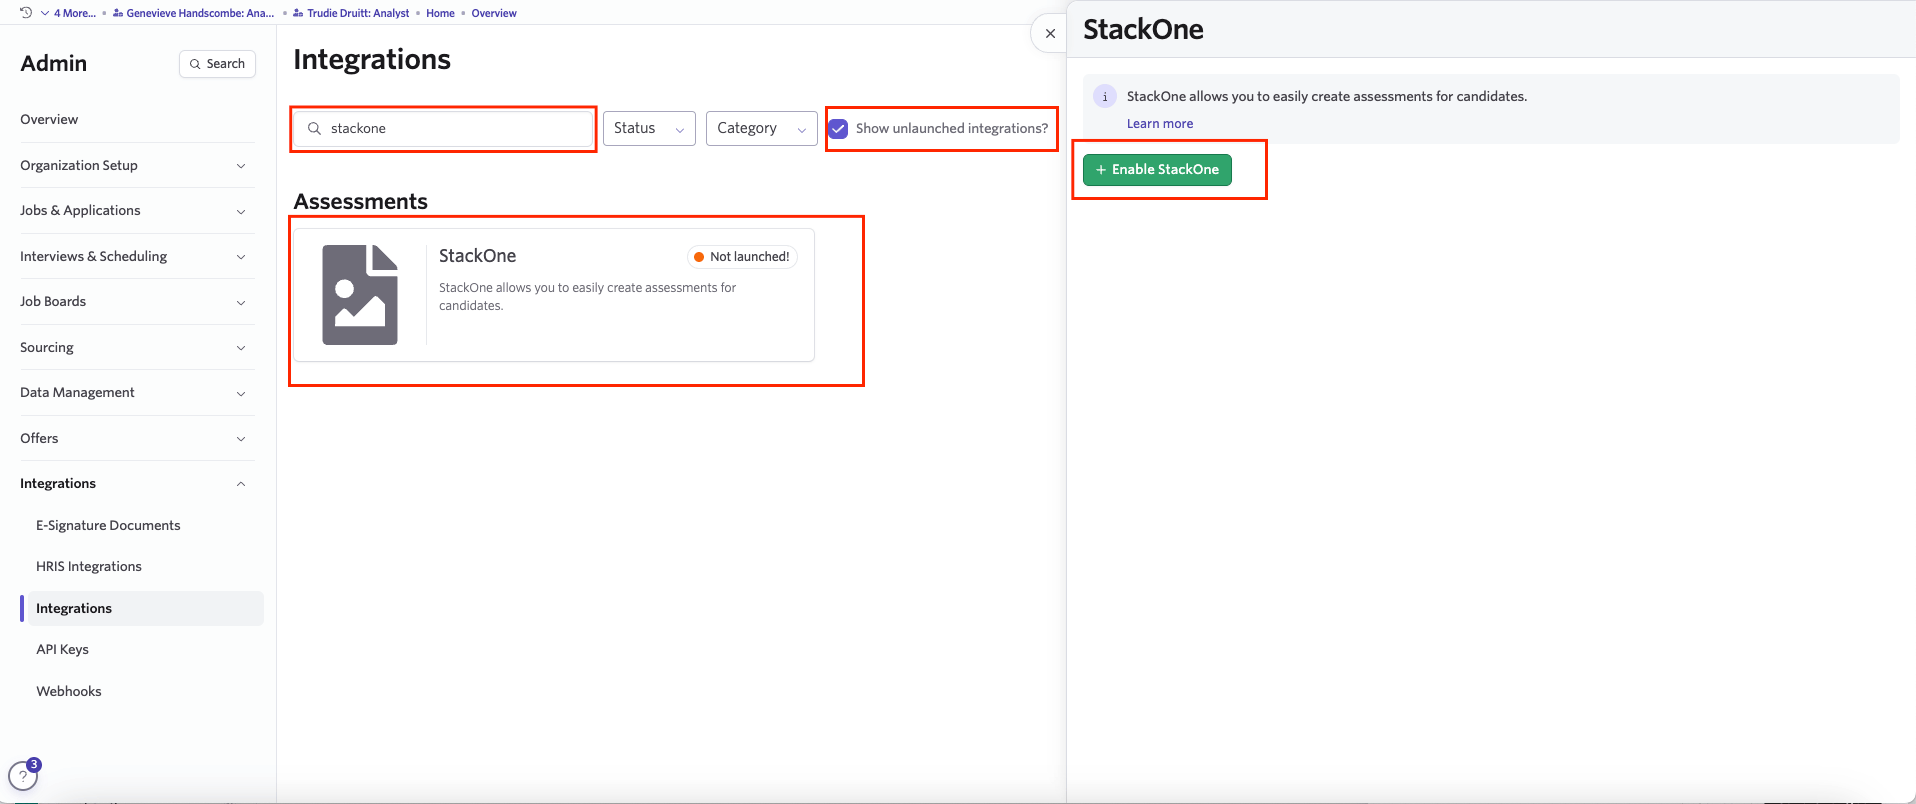
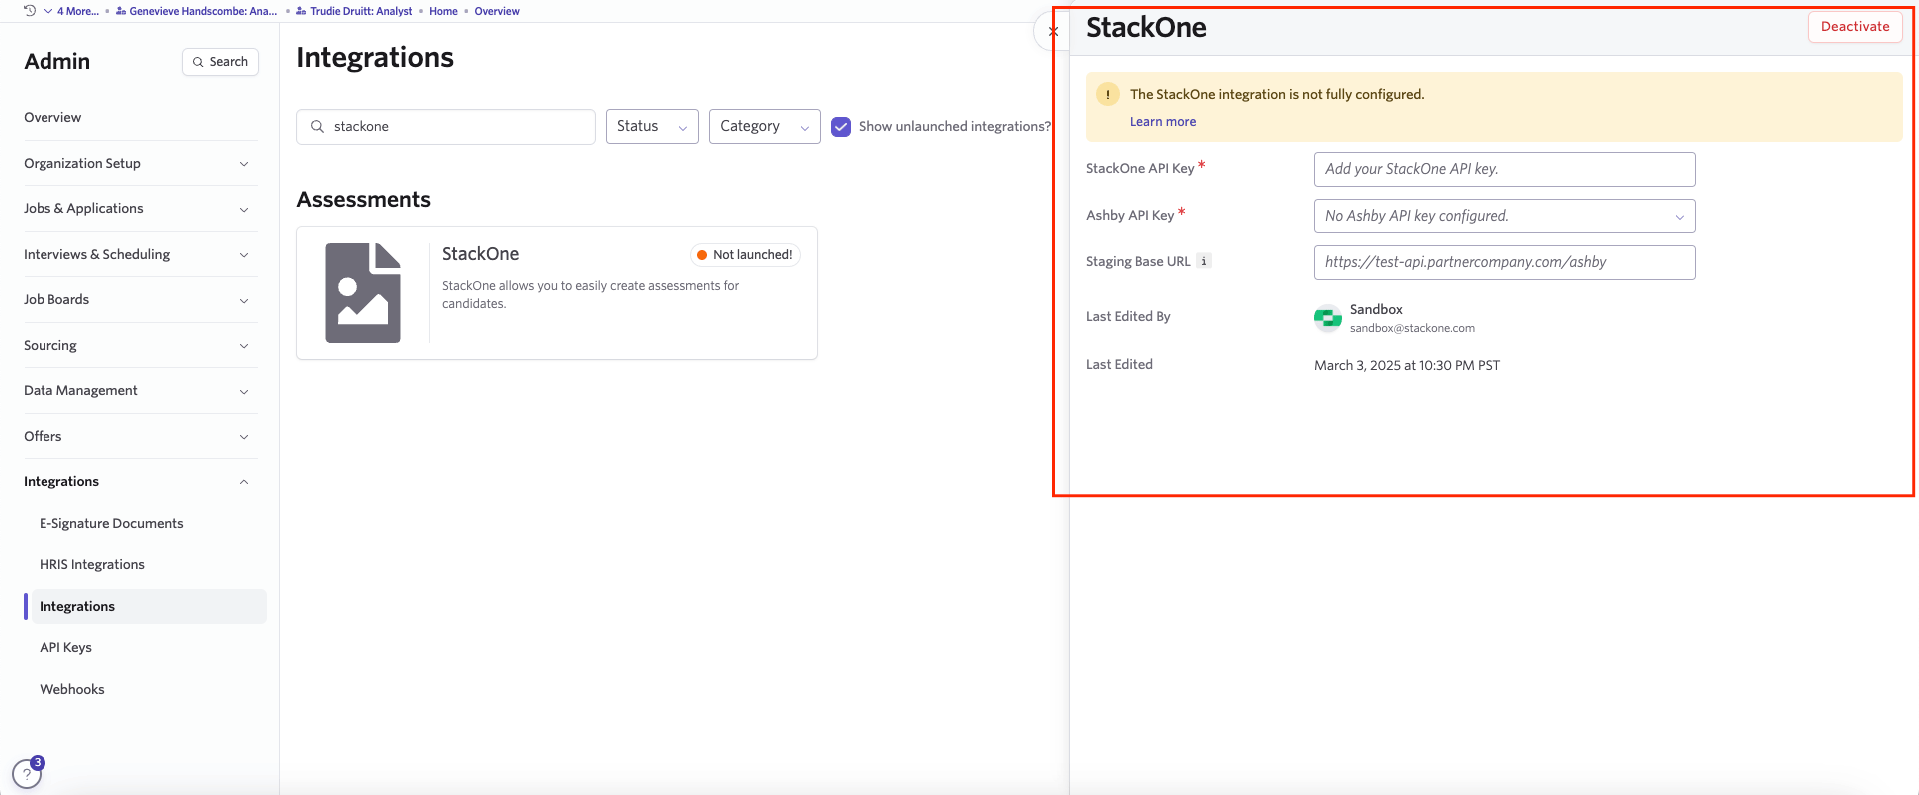
    Check the Show unlaunched integrations flag, search for `Stackone` Integration and click on the integration as shown below. A pop up for enabling the `Stackone` integration will appear. Click on Enable `Stackone` integrations.
    <Frame>
      <img className="rounded-md" style={{ margin: '0 auto', border: '1px solid #efefef' }} alt="Edit/View Assessment/Background check Status ID" src="https://mintcdn.com/stackone-hub-int-8679-hris-ukgprowfm-integration-user-manag/JqrPpQ92JYXhXNTR/images/ashby-background-check/ashby-bcheck-2.png?fit=max&auto=format&n=JqrPpQ92JYXhXNTR&q=85&s=979b9054453795b5ea3001993db0030b" width="1916" height="804" data-path="images/ashby-background-check/ashby-bcheck-2.png" />
    </Frame>

    Once you enable the integration, a pop-up will appear, prompting you to fill in the required fields shown below.
    <Frame>
      <img className="rounded-md" style={{ margin: '0 auto', border: '1px solid #efefef' }} alt="Edit/View Assessment/Background check Status ID" src="https://mintcdn.com/stackone-hub-int-8679-hris-ukgprowfm-integration-user-manag/JqrPpQ92JYXhXNTR/images/ashby-background-check/ashby-bcheck-3.png?fit=max&auto=format&n=JqrPpQ92JYXhXNTR&q=85&s=83cfe7a946d561382bf920383ebdb493" width="1919" height="795" data-path="images/ashby-background-check/ashby-bcheck-3.png" />
    </Frame>

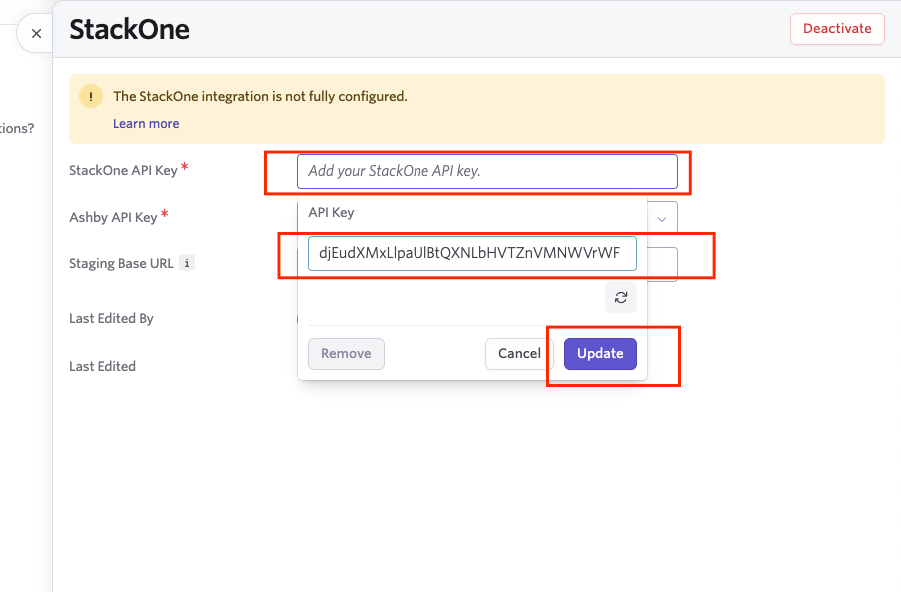
    Please click on `StackOne API Key`. An input field will appear, allowing you to enter the `External Trigger Token` provided by the StackOne Hub. After entering the `External Trigger Token`, click Update.
    <Frame>
      <img className="rounded-md" style={{ margin: '0 auto', border: '1px solid #efefef' }} alt="Edit/View Assessment/Background check Status ID" src="https://mintcdn.com/stackone-hub-int-8679-hris-ukgprowfm-integration-user-manag/JqrPpQ92JYXhXNTR/images/ashby-background-check/ashby-bcheck-4.png?fit=max&auto=format&n=JqrPpQ92JYXhXNTR&q=85&s=6334ac9ffaf1ae0376f58d363f42dca6" width="901" height="592" data-path="images/ashby-background-check/ashby-bcheck-4.png" />
    </Frame>

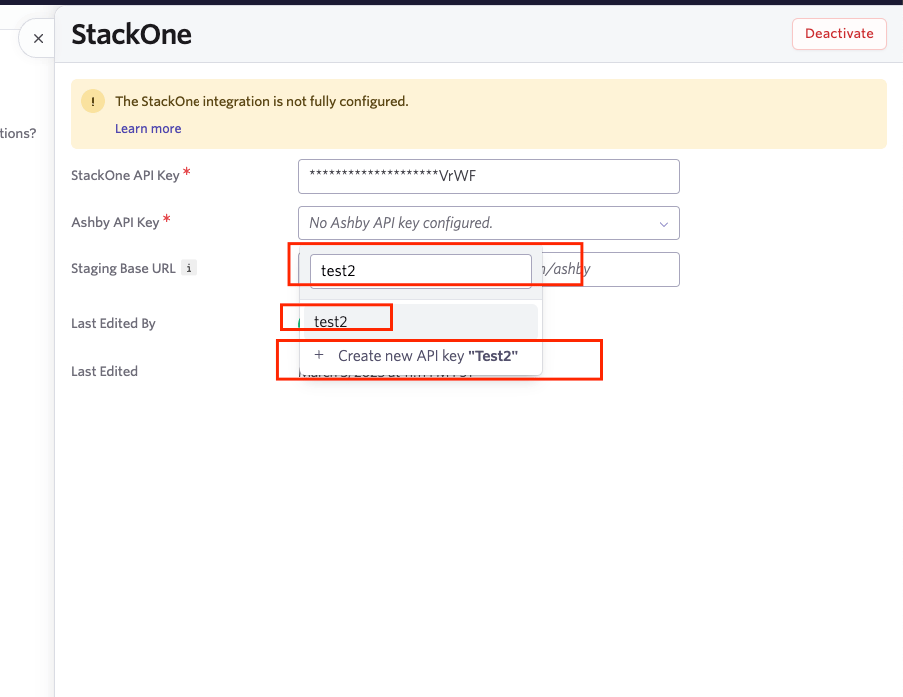
    Please click on `Ashby API Key`. A search bar will appear, allowing you to enter the name of an existing Ashby API Key. If you want to use an existing one, select it; otherwise, click Create New API Key.
    <Frame>
      <img className="rounded-md" style={{ margin: '0 auto', border: '1px solid #efefef' }} alt="Edit/View Assessment/Background check Status ID" src="https://mintcdn.com/stackone-hub-int-8679-hris-ukgprowfm-integration-user-manag/JqrPpQ92JYXhXNTR/images/ashby-background-check/ashby-bcheck-5.png?fit=max&auto=format&n=JqrPpQ92JYXhXNTR&q=85&s=f9b1fd5a50497a21a7afb0285fa3c1a3" width="903" height="697" data-path="images/ashby-background-check/ashby-bcheck-5.png" />
    </Frame>

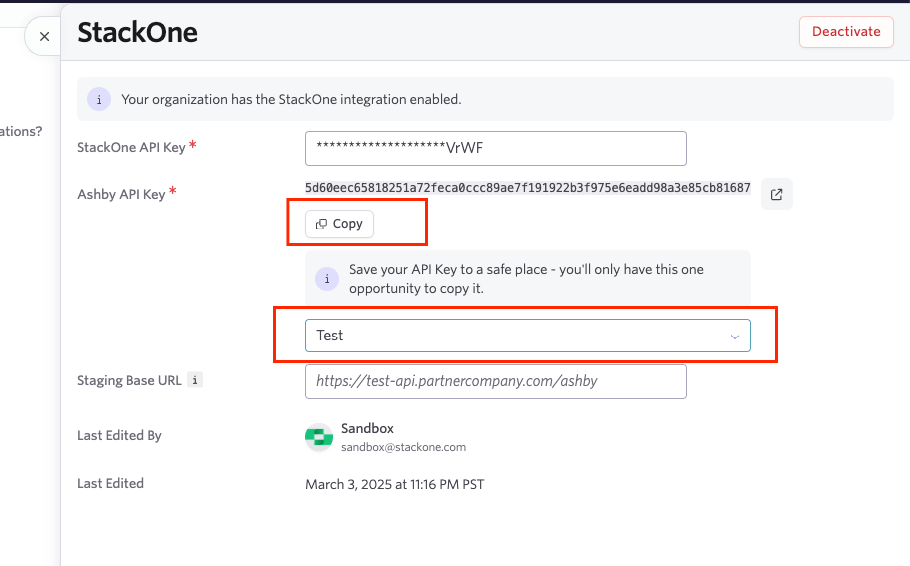
    Ashby API Key will be generated and displayed. Please copy your Ashby API Key as this is shown only once
    <Frame>
      <img className="rounded-md" style={{ margin: '0 auto', border: '1px solid #efefef' }} alt="Edit/View Assessment/Background check Status ID" src="https://mintcdn.com/stackone-hub-int-8679-hris-ukgprowfm-integration-user-manag/JqrPpQ92JYXhXNTR/images/ashby-background-check/ashby-bcheck-6.png?fit=max&auto=format&n=JqrPpQ92JYXhXNTR&q=85&s=d2714c9f0f771b7562d51b7b8ad319af" width="910" height="566" data-path="images/ashby-background-check/ashby-bcheck-6.png" />
    </Frame>
  </Step>
</Steps>

## Adding Background check to Candidate Pipeline.
<Steps>
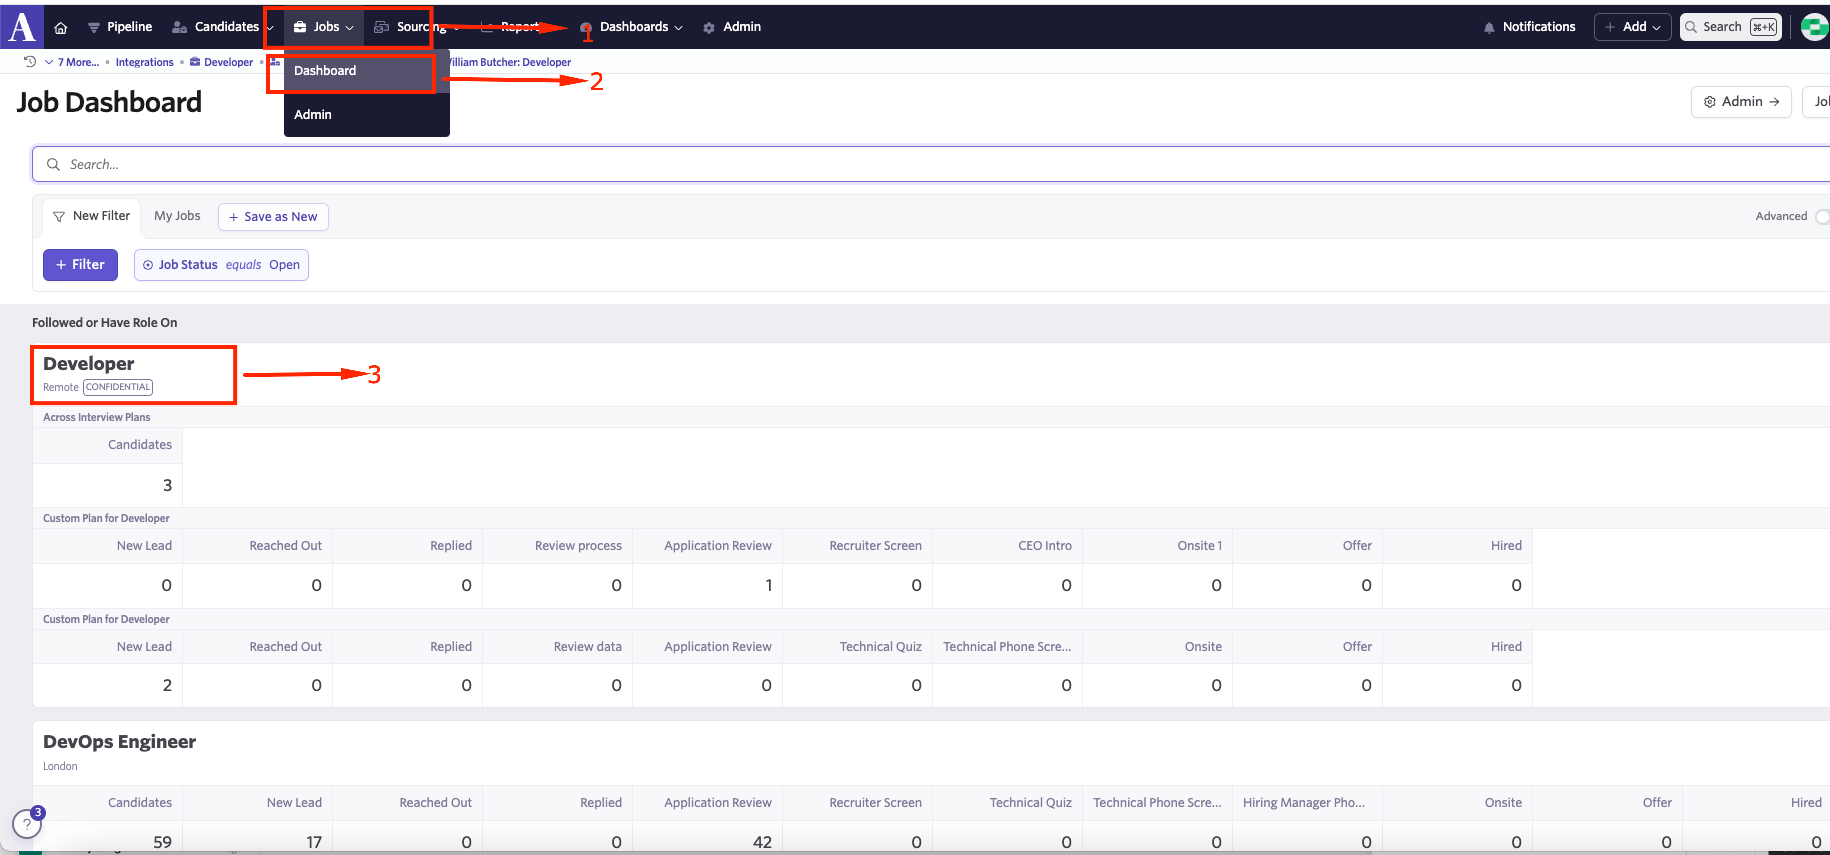
  <Step title="Navigate to your job dashboard and select a job from the job list">
    <Frame>
      <img className="rounded-md" style={{ margin: '0 auto', border: '1px solid #efefef' }} alt="Edit/View Assessment/Background check Status ID" src="https://mintcdn.com/stackone-hub-int-8679-hris-ukgprowfm-integration-user-manag/JqrPpQ92JYXhXNTR/images/ashby-background-check/ashby-bcheck-7.png?fit=max&auto=format&n=JqrPpQ92JYXhXNTR&q=85&s=4384e65446a3287aa8e51ea529168801" width="1830" height="855" data-path="images/ashby-background-check/ashby-bcheck-7.png" />
    </Frame>
  </Step>

  <Step title="Select a candidate from candidate pipeline stage">
    <Frame>
      <img className="rounded-md" style={{ margin: '0 auto', border: '1px solid #efefef' }} alt="Edit/View Assessment/Background check Status ID" src="https://mintcdn.com/stackone-hub-int-8679-hris-ukgprowfm-integration-user-manag/JqrPpQ92JYXhXNTR/images/ashby-background-check/ashby-bcheck-8.png?fit=max&auto=format&n=JqrPpQ92JYXhXNTR&q=85&s=d1abe69fbeee3a683095348292049b5b" width="1918" height="798" data-path="images/ashby-background-check/ashby-bcheck-8.png" />
    </Frame>
  </Step>

  <Step title="To select the background check tests">
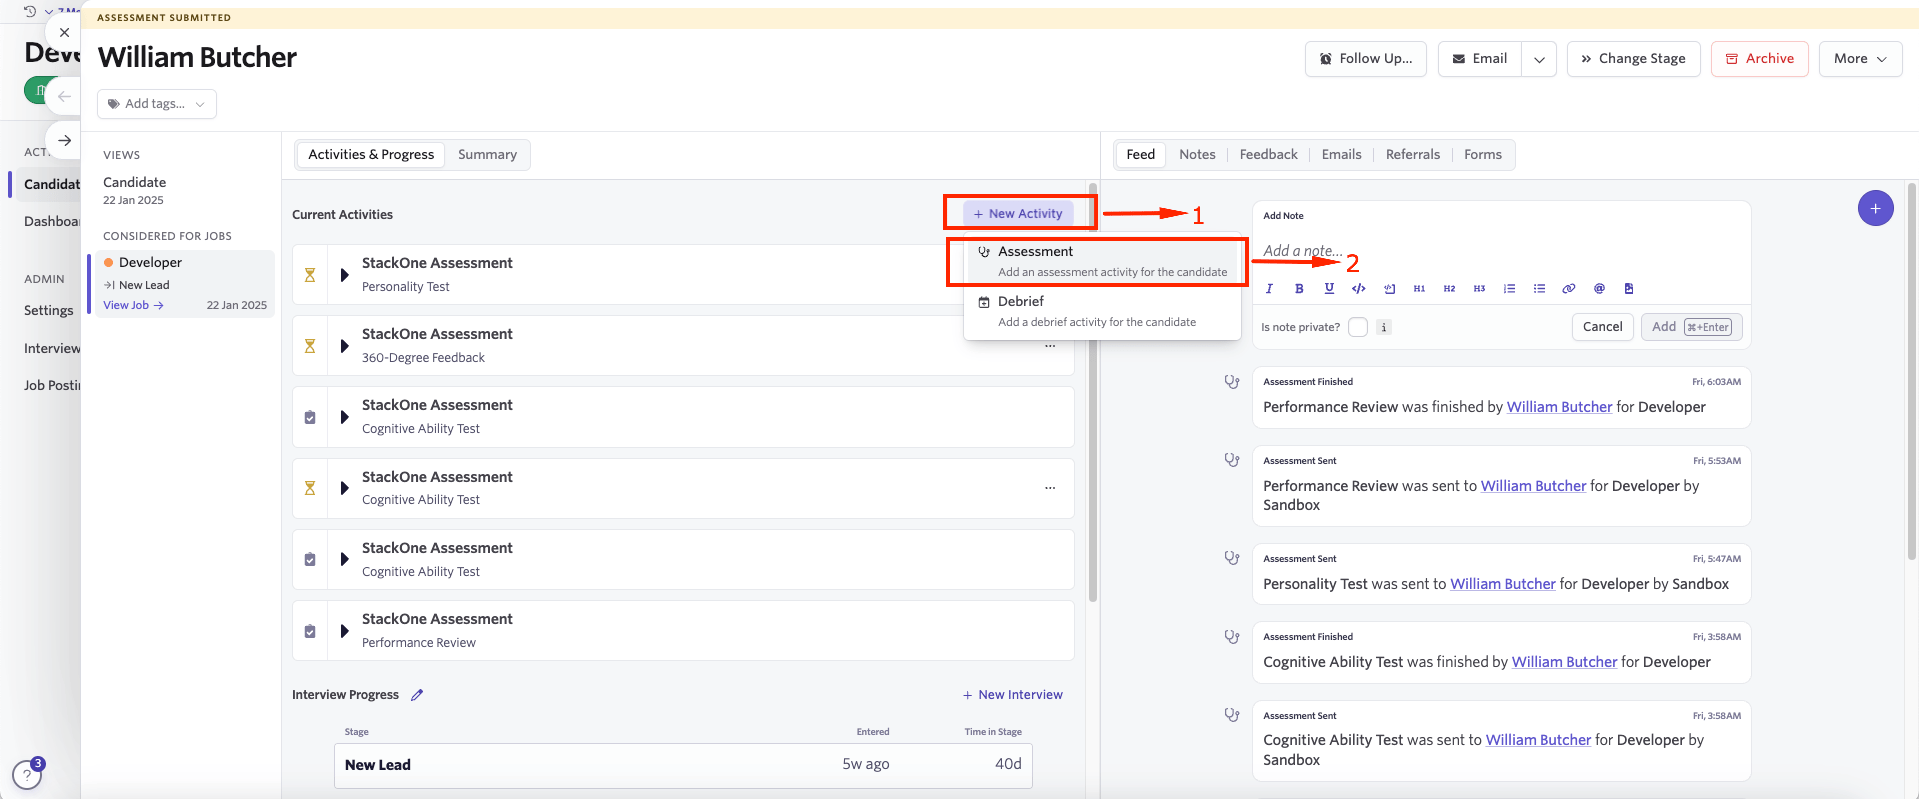
    Click on `New Activity` to add an background check at this stage. Click on `Assessment` that appears after `New Activity` is clicked.
    <Frame>
      <img className="rounded-md" style={{ margin: '0 auto', border: '1px solid #efefef' }} alt="Edit/View Assessment/Background check Status ID" src="https://mintcdn.com/stackone-hub-int-8679-hris-ukgprowfm-integration-user-manag/JqrPpQ92JYXhXNTR/images/ashby-background-check/ashby-bcheck-9.png?fit=max&auto=format&n=JqrPpQ92JYXhXNTR&q=85&s=f9c7698702a14f76341296e90cad0771" width="1919" height="799" data-path="images/ashby-background-check/ashby-bcheck-9.png" />
    </Frame>

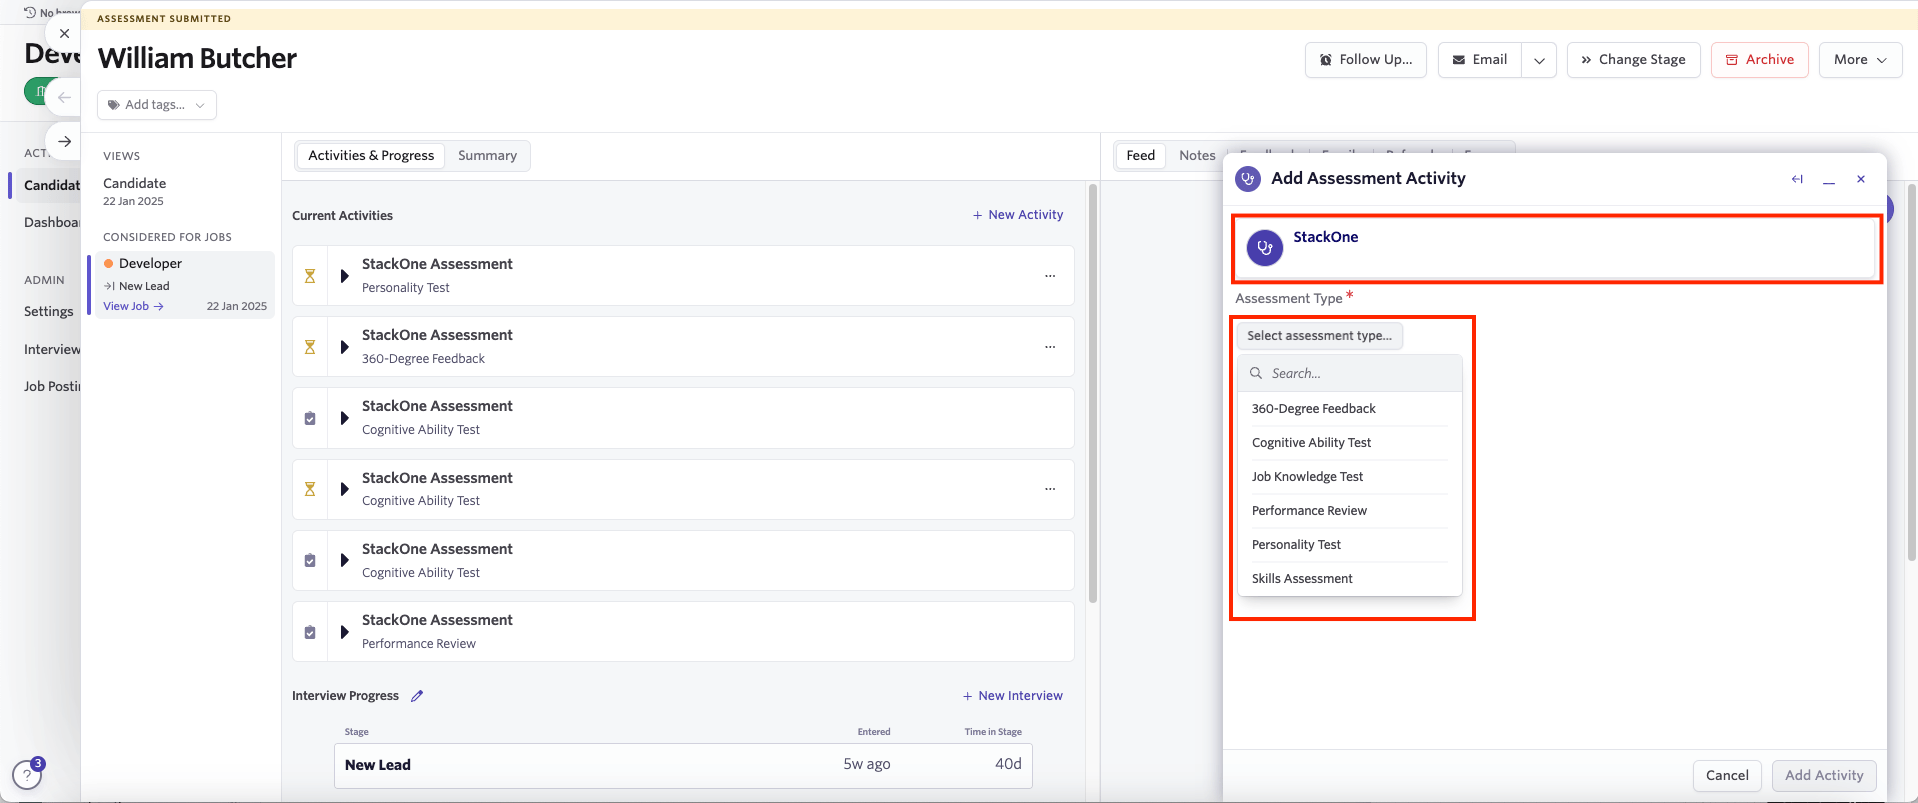
    You will be redirected to `Add Assessment Activity` pop up. Please click on the `Stackone` assessment in Add Assessment Activity. Select the `Assessment Type` from the dropdown list.
    <Frame>
      <img className="rounded-md" style={{ margin: '0 auto', border: '1px solid #efefef' }} alt="Edit/View Assessment/Background check Status ID" src="https://mintcdn.com/stackone-hub-int-8679-hris-ukgprowfm-integration-user-manag/JqrPpQ92JYXhXNTR/images/ashby-background-check/ashby-bcheck-10.png?fit=max&auto=format&n=JqrPpQ92JYXhXNTR&q=85&s=5aac324e810a85689d5f8d86c99315fd" width="1918" height="803" data-path="images/ashby-background-check/ashby-bcheck-10.png" />
    </Frame>

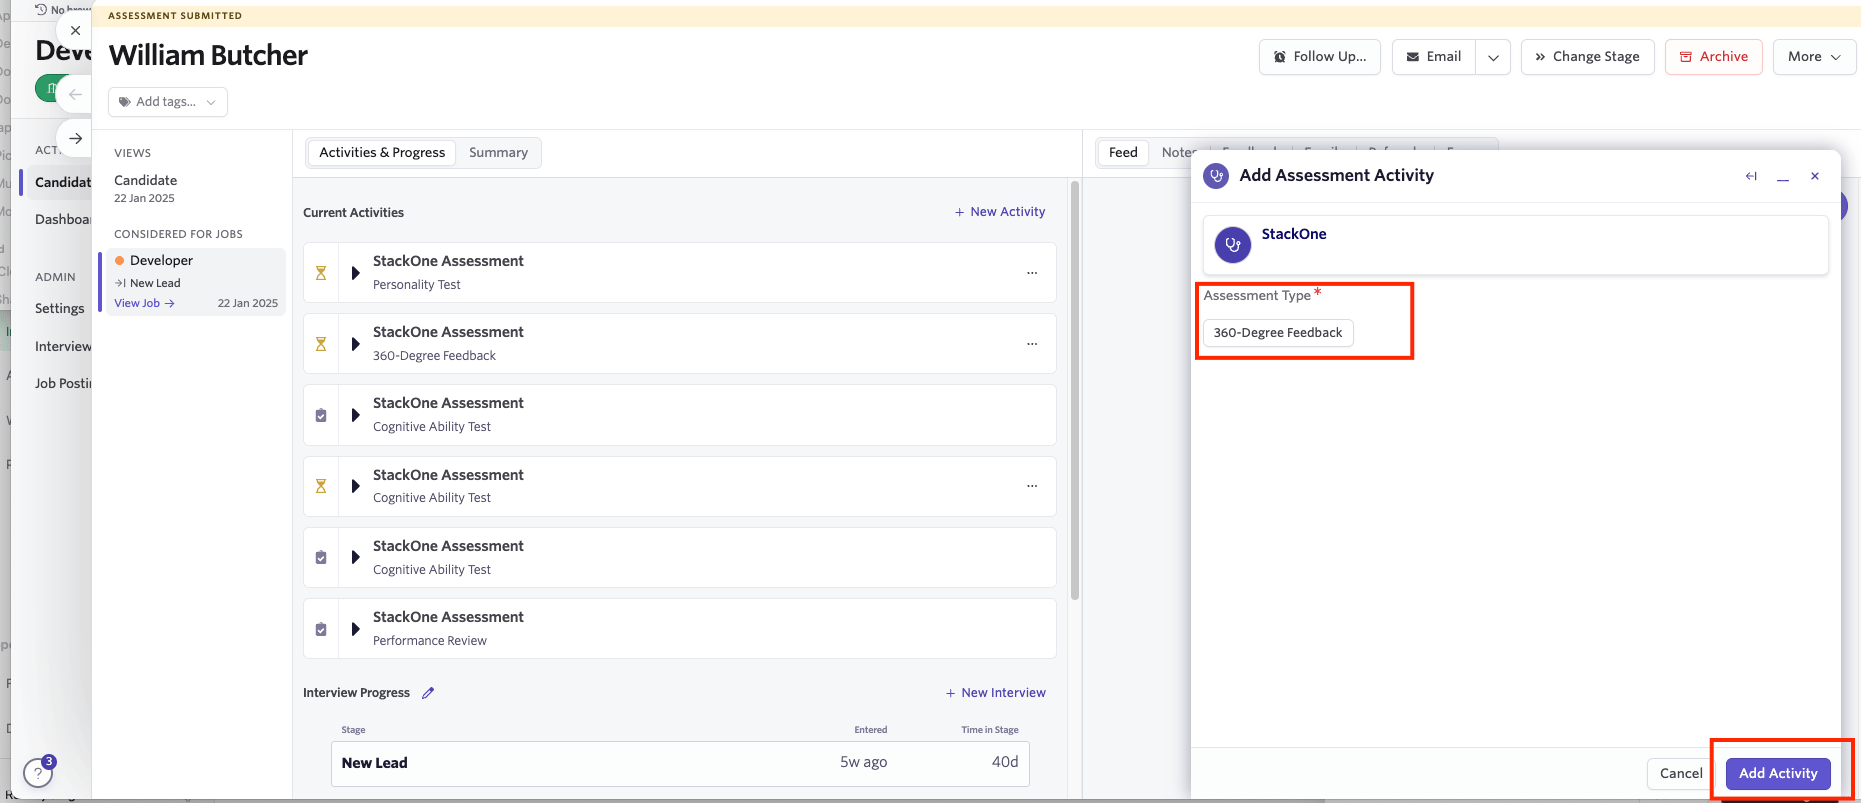
    Once selected, click on the `Add Activity` button at the bottom right corner of the` Add Assessment Activity`.
    <Frame>
      <img className="rounded-md" style={{ margin: '0 auto', border: '1px solid #efefef' }} alt="Edit/View Assessment/Background check Status ID" src="https://mintcdn.com/stackone-hub-int-8679-hris-ukgprowfm-integration-user-manag/JqrPpQ92JYXhXNTR/images/ashby-background-check/ashby-bcheck-11.png?fit=max&auto=format&n=JqrPpQ92JYXhXNTR&q=85&s=fcb4d7bbc8570305581b058b2ec8e144" width="1861" height="803" data-path="images/ashby-background-check/ashby-bcheck-11.png" />
    </Frame>

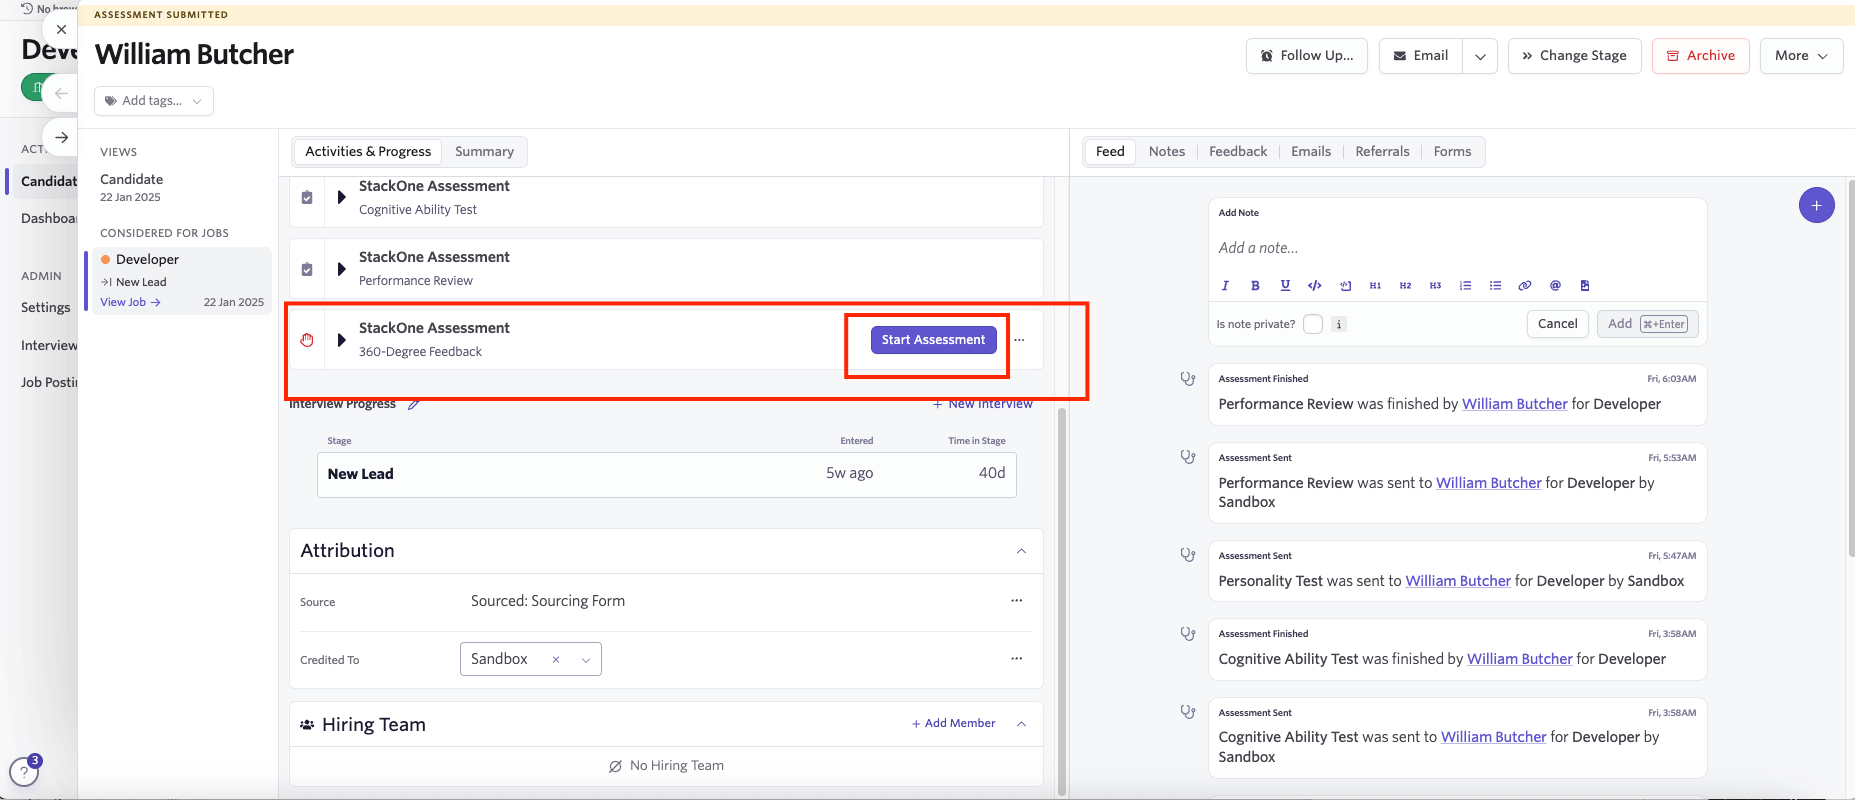
    You will now see that the background check has been added to the candidate profile with a `Start Assessment` button in the `Activity` section.
    <Frame>
      <img className="rounded-md" style={{ margin: '0 auto', border: '1px solid #efefef' }} alt="Edit/View Assessment/Background check Status ID" src="https://mintcdn.com/stackone-hub-int-8679-hris-ukgprowfm-integration-user-manag/JqrPpQ92JYXhXNTR/images/ashby-background-check/ashby-bcheck-12.png?fit=max&auto=format&n=JqrPpQ92JYXhXNTR&q=85&s=3d733c7c2644ffc795da53c9d4b45372" width="1855" height="800" data-path="images/ashby-background-check/ashby-bcheck-12.png" />
    </Frame>
  </Step>
</Steps>

## Sending StackOne background check test to a Candidate

<Steps>
  <Step title="To send an background check test to the candidate">
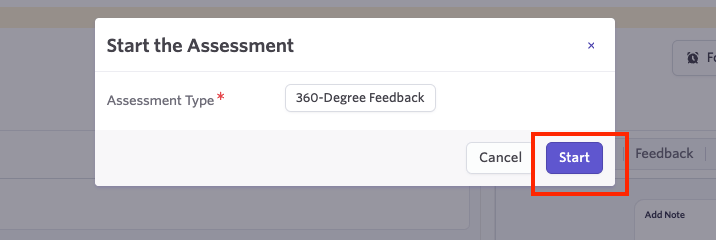
    Click the `Start Assessment` button in the Activity section of the selected candidate. A confirmation pop-up will appear, displaying the selected background check type. You can also modify the background check type using the dropdown list. Click `Start` to send the test.
    <Frame>
      <img className="rounded-md" style={{ margin: '0 auto', border: '1px solid #efefef' }} alt="Edit/View Assessment/Background check Status ID" src="https://mintcdn.com/stackone-hub-int-8679-hris-ukgprowfm-integration-user-manag/JqrPpQ92JYXhXNTR/images/ashby-background-check/ashby-bcheck-13.png?fit=max&auto=format&n=JqrPpQ92JYXhXNTR&q=85&s=89c5bb9f6711b28b492e2c7c71bfb38a" width="716" height="240" data-path="images/ashby-background-check/ashby-bcheck-13.png" />
    </Frame>

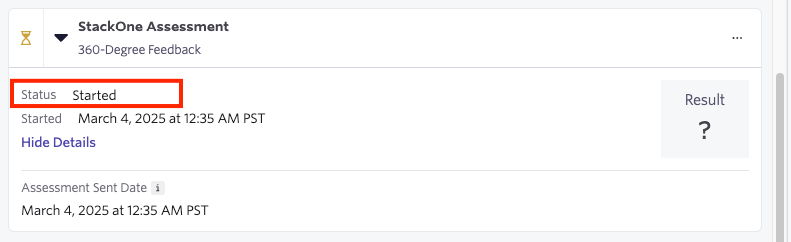
    The screen displays the background check status along with the date and time it was sent. Since the candidate has not yet completed the assessment, the result will remain pending.
    <Frame>
      <img className="rounded-md" style={{ margin: '0 auto', border: '1px solid #efefef' }} alt="Edit/View Assessment/Background check Status ID" src="https://mintcdn.com/stackone-hub-int-8679-hris-ukgprowfm-integration-user-manag/JqrPpQ92JYXhXNTR/images/ashby-background-check/ashby-bcheck-14.png?fit=max&auto=format&n=JqrPpQ92JYXhXNTR&q=85&s=75e7fa07555a7c7b0d68aef41abe9883" width="791" height="242" data-path="images/ashby-background-check/ashby-bcheck-14.png" />
    </Frame>
  </Step>
</Steps>

## View Candidate’s Result in Ashby

<Steps>
  <Step title="To get the result details">
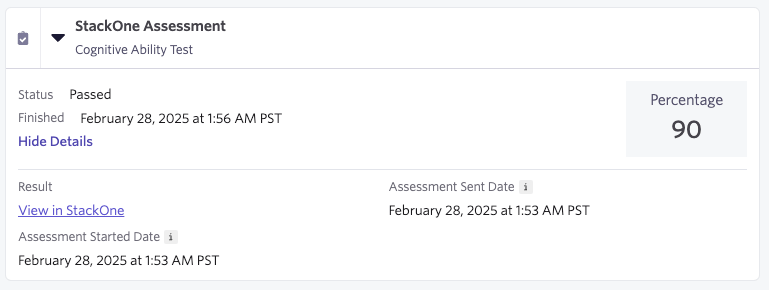
    A detailed result, along with a `Full Report link`, will appear once the candidate has completed the assessment
    <Frame>
      <img className="rounded-md" style={{ margin: '0 auto', border: '1px solid #efefef' }} alt="Edit/View Assessment/Background check Status ID" src="https://mintcdn.com/stackone-hub-int-8679-hris-ukgprowfm-integration-user-manag/JqrPpQ92JYXhXNTR/images/ashby-background-check/ashby-bcheck-15.png?fit=max&auto=format&n=JqrPpQ92JYXhXNTR&q=85&s=7c8f2334416d9116a760b94d21d5205c" width="769" height="290" data-path="images/ashby-background-check/ashby-bcheck-15.png" />
    </Frame>
  </Step>
</Steps>

## Useful Links

<Card title="API Reference" icon="link" href="https://developers.ashbyhq.com/reference/assessmentstart">
  [https://developers.ashbyhq.com/reference/assessmentstart](https://developers.ashbyhq.com/reference/assessmentstart)
</Card>